Interface Overview
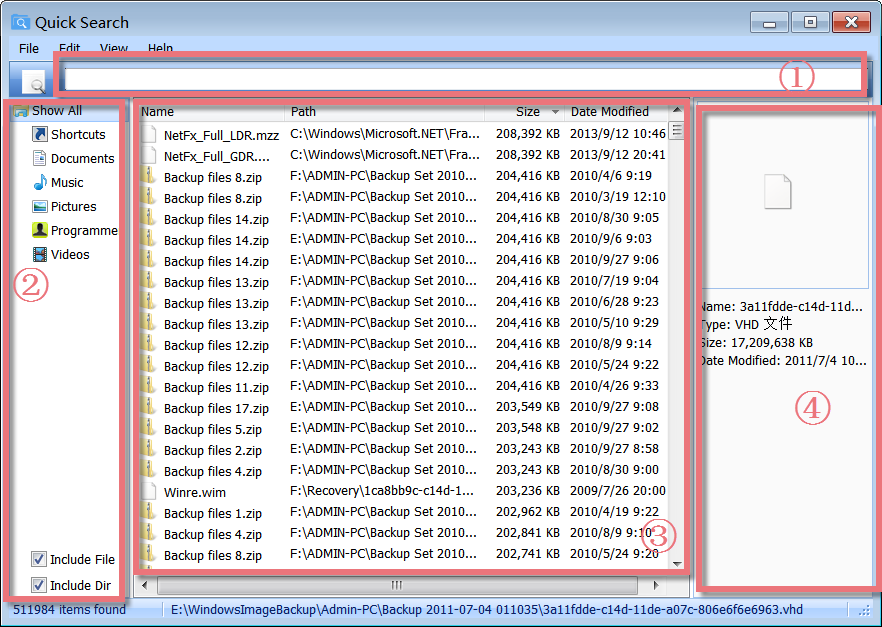
1. The Upper Box: allows you to search the files or folders by entering key letters or words.
2. The Left-hand Side Lower Box: click “shortcuts”, “Documents”, “Music”, “Pictures”, “Programme” or “videos” to narrow down the results of the search on the files or folders you need.
3. The Middle Lower box: displays all files and folders with their name, original path, size, and date modified.
4. The Right-hand Side Lower Box: shows detailed information on a selected file, such as file name, type, size, file icon, and date modified.
Real-time Searching
Quick Search offers a search filter to limit the search range and narrow down the search results for higher working efficiency. Type the partial file or folder name into the search field, the results will appear instantly.
Using the Search field in the upper part of the main window, you can filter the list of the files by name, path, and type. When you enter some key letters in the Search field right below, you will see the number of related files that match the search criteria in real-time.
Search for Files from Local Disks or External Devices
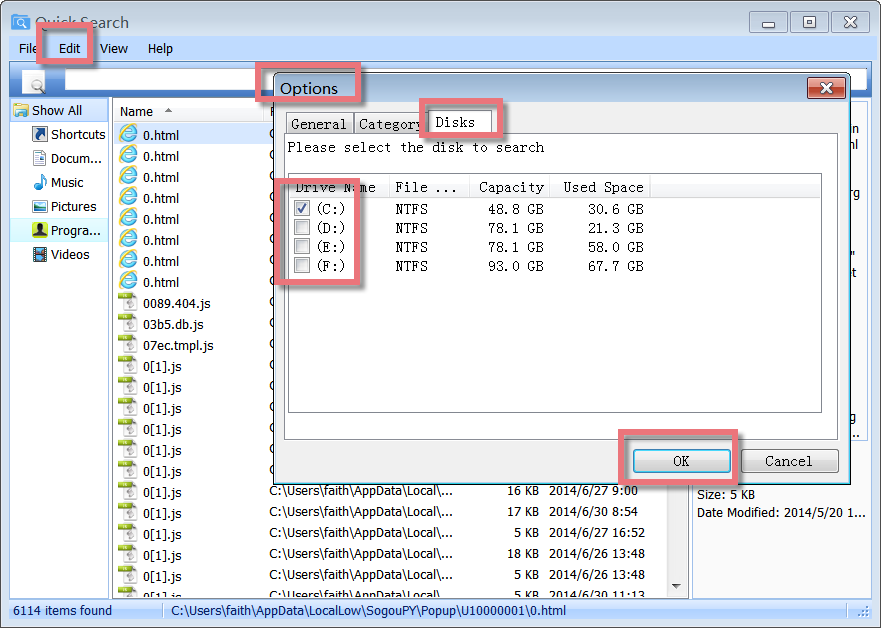
Quick Search can scan all parts of a drive, searching for many of your files. It offers a quick and effective way to find needed files from local disks or external devices and will show you a laundry list of files on the drive. To narrow down the list of files, you can only choose the needed disk to search by clicking “Edit”-> “Options”->”Disks”.
Two ways to Search for a File Type
To search for a file type, enter the file extension into the search field, ie, to search for the mp4 file type, enter *.mp4 into the search field. To search for more than one file type, use a | to separate file types, ie, *.png|*.jpg will search for files with the extension png or jpg.

The other way to search for a file type is: you can click Edit, and then choose Options, and find the Category tab. When you click each category, a list of the related extension will display on the right side. It allows you to add, modify or remove file extensions. After you successfully schedule the category, you can click the category on the left part of the main window, and several related files that match the search criteria will appear in real-time on the middle panel.
Search for Files and Folders in a Specific Location
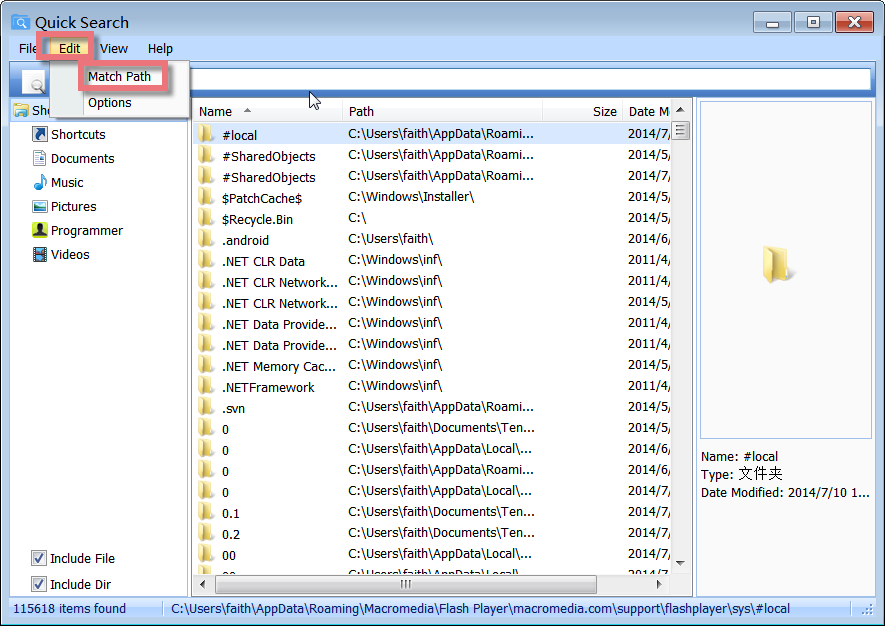
To search for files and folders in a specific location, you could enable Match Path in the Edit menu. When Match Path is checked, you can filter the list of files by path and file name. If do not mark Match Path, when you type some text in the Search field right below, you will only see the number of files listed by file name.
Sort the List of Files and Folders
On the description panel, click the column heading you want to sort by. To reverse the sort order, click the column heading a second time. You can sort the list of files and folders by Name, Path, Size, and Date Modified.
Auto Start on Windows Logon and Stop running Quick Search when Closing it

Click from the “Edit” menu and select “Options”. A box will pop up. If you want to stop/start Quick Search on Windows logon, you can decide whether to checkup the box before “Start automatically on Windows logon” or not under the “General” tab.
If you want to stop running Quick Search at once after you close the software, please do not checkup the box before “Minimize to tray when you close the program window” under the “General” tab.
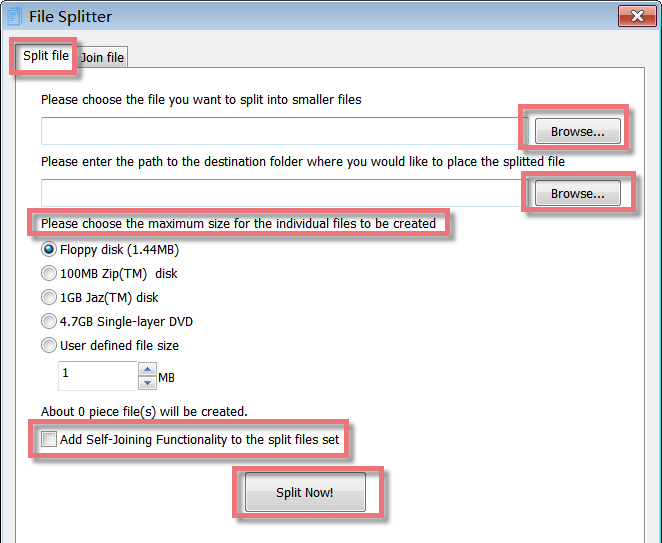
]]>Interface Overview

1.The First Line Buttons: quick access button to the “Split file” or “Join file” function.
2.The Upper Box: allows you to add a file that you want to split and choose the destination folder where you would like to place the split file.
3.The Lower Box: allows you to choose the file size for the single parts from the proposal list or enter a user-defined file size using the arrows in the User-defined file size field.
Add Self-Joining Functionality to the split files set
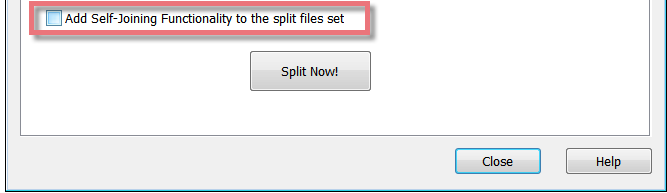
File Splitter and Joiner lets you add Self-Joining functionality to your pieces. When File Splitter and Joiner split your file into pieces, it can make a Self-Joining program (true Windows executable file). This small program can join the piece files together to restore the original file. If you want to rejoin the pieces later without this software, please mark the checkbox for “Add Self-Joining Functionality to the split files set”.
Select the Maximum sizes for the single parts

You can choose the maximum size for the single parts from the proposal list, including Floppy disk(1.44MB), 100MB Zip(TM) disk, 1GB Jaz(TM) disk, and 4.7GB Single-layer DVD. Or you can enter a user-defined file size using the arrows in the User-defined file size field. As soon as the file size is selected, it will tell you how many pieces of files will be created.
To split a file:
1. First you select the file you want to split by using the Browse… button.
2.Select the destination folder where you want to place the split files using the Browse… button.
3.Please select the file size for the individual parts either from the proposal list or enter a user defined file size using the arrows in the User-defined file size field.
4.If you want to rejoin the pieces later without this software, please mark the checkbox for “Add Self-Joining Functionality to the split files set”.
5.Click on the Split Now! button.
6.The module will now generate the single parts. This will not delete the original file. The new files will be stored in the destination folder you selected.
The first part will get the extension “.00001.gfs”; the second one “.00002.gfs” and so on.
If you mark the checkbox for “Add Self-Joining Functionality to the split files set”, The first part will get the extension “.00001.exe”; the second one “.00002.gfs” and so on.
7.Clicking on OK in the confirmation dialog brings you back to the start screen of File Splitter and Joiner.
To re-join a set of split files
Please copy the split files to the same folder. If you added Self-Joining Functionality to the split files set, launch “your file name.00001.exe”, select a destination folder where you want to place the restored file, and click the “Join Now” button. If you did not create Self-joining pieces, please follow the steps below.
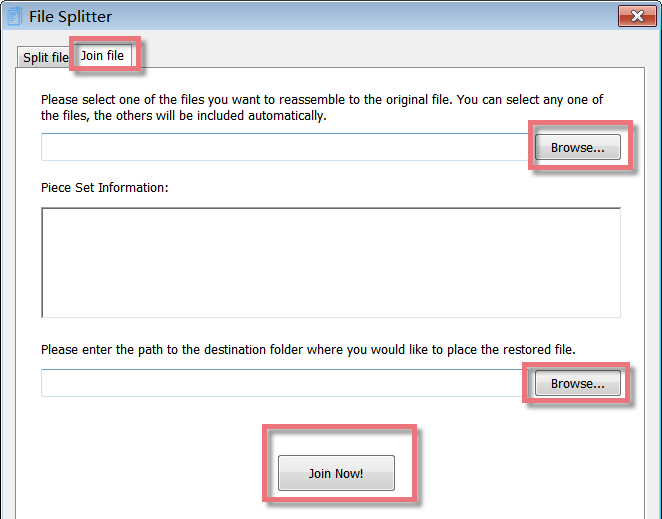
1.Please select any one of the piece files by using the Browse… button. Once you have selected one part, the module displays the information about the original file and the number of pieces.
2.Select the destination folder where you want to place the restored files using the Browse… button.
3.Click on the Join Now! button.
4.The module will now rejoin all pieces into one single file. The new file will be stored in the destination folder you selected.
5. Clicking on OK in the confirmation dialog brings you back to the start screen of File Splitter and Joiner.
]]>Interface Overview
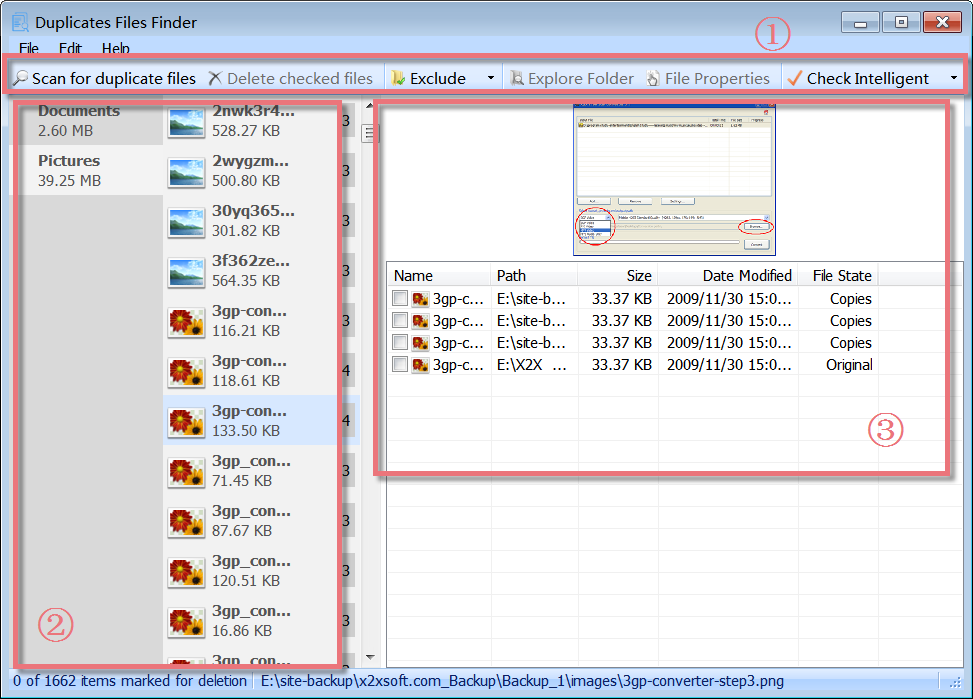
1.The Second Line Button: quick access button to “scan for duplicate files” on the fixed drive, “delete checked files”, “exclude this folder from future searches” or “check intelligent” on the duplicate file.
2.Left-hand Box: click the file type on the left side to narrow down the results of the search on the duplicate files. If you click on a file type, a long list of related files with some information is shown, such as their name, and size.
3.Right-hand Box: you can preview the picture from the upper box, and some detailed information is shown on a selected file on the below box, such as the file name, the path, size, the date modified, and its file state.
Select the Drives or Folder to Scan
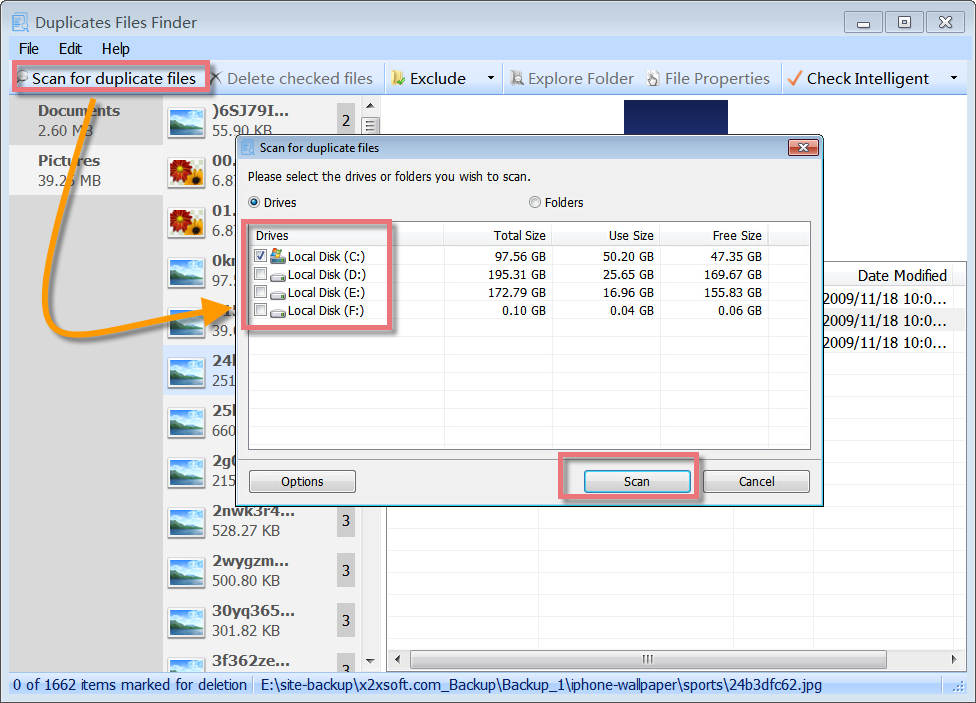
Duplicate Files Finder can scan all parts of a drive, searching for a large number of duplicate files. It offers a quick and effective way to find the same files from local disks or folders and will show you a list of duplicate files on the drive. Just click “Scan for duplicate files” choose the drive or the folder you want to scan, and then click on the “Scan” button, all kinds of duplicate files will be shown at once.
Set up Scan for Parameter
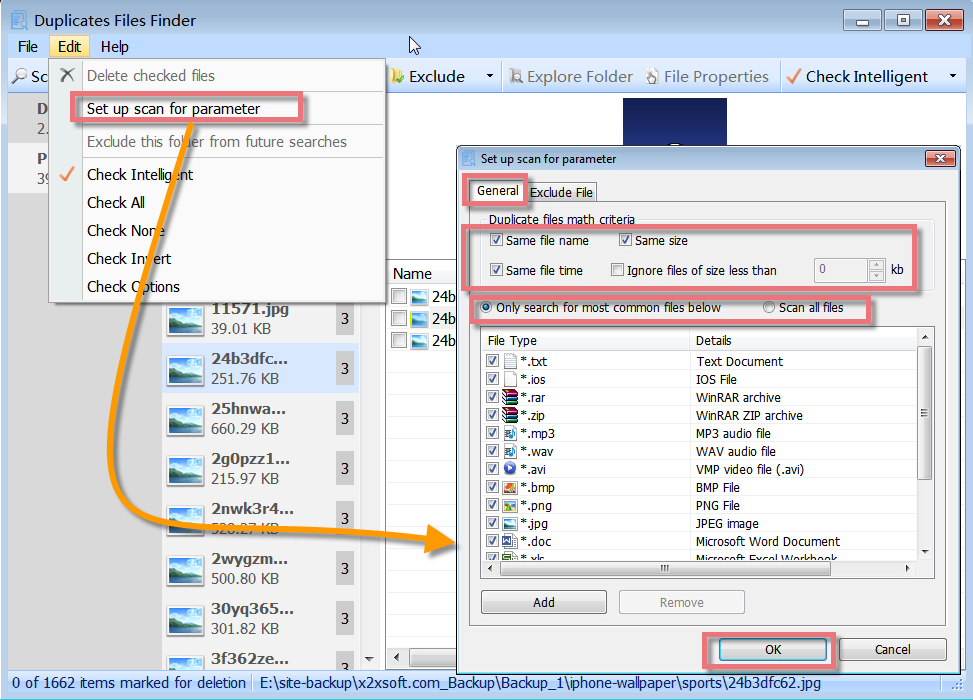
Duplicate Files Finder allows you to set up a scan for parameters. You can click “Edit” -> “Set up scan for parameter”, and a new box will pop up. Here you can select duplicate files to match criteria and select to scan all files or only scan for those file types that are in the type list. It supports custom matching conditions by file type, name, size, and date of creation to find your duplicate search. Photos, music, Word documents, videos – you name it. If it appears twice on your system, then Duplicate Files Finder will find it. Duplicate Files Finder can deeply scan for all types of files, takes only one or two clicks, and send them to the recycle bin with your permission.
Check more than one Duplicate File Group with Check Intelligent
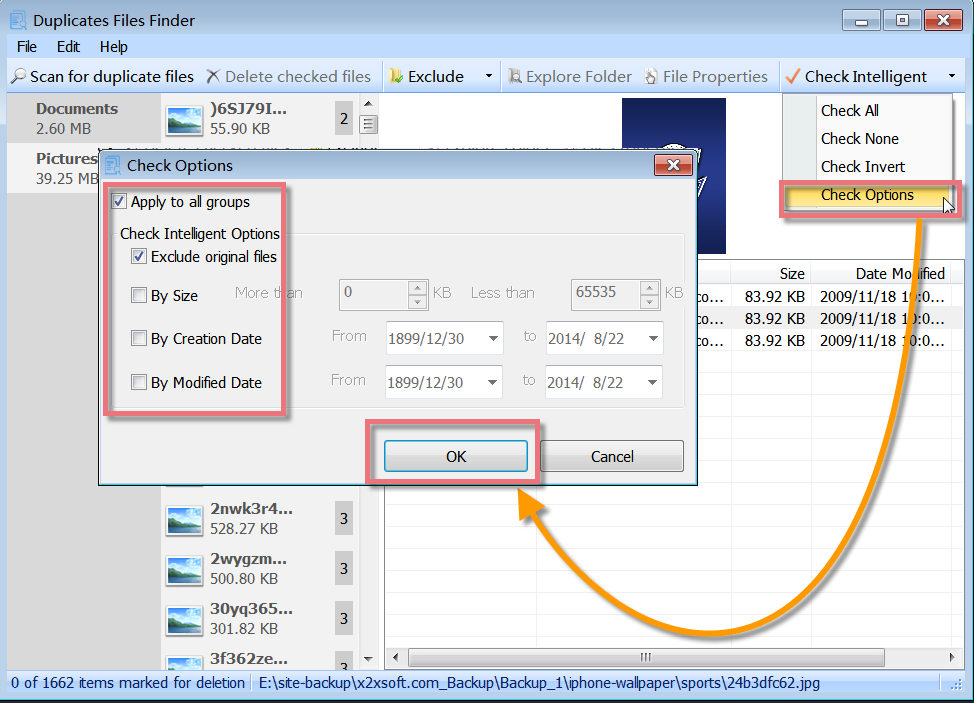
To save you much time on checking duplicate files, Duplicate Files Finder offers a powerful feature that can check more than one duplicate file group at a time. Just click “Check Intelligent”. It can help to check all the duplicate files at once. You can also set up the check intelligent options, including excluding original files, size, creation date, or modified date. If you want to check all duplicate files, check none, check invert or schedule the check options, click an inverted black triangle symbol beside “Check Intelligent”.
How to use Duplicate Files Finder
- Click ‘Scan for duplicate files’ to start the Scanning wizard.
- Select the drives/folders on the hard disk you want to scan by checking the appropriate drives. Then click ‘Next’ to proceed further.
- Select duplicate files to match criteria and select to scan all files or only scan for those file types that are in the type list. Then click ‘Next’ to proceed further.
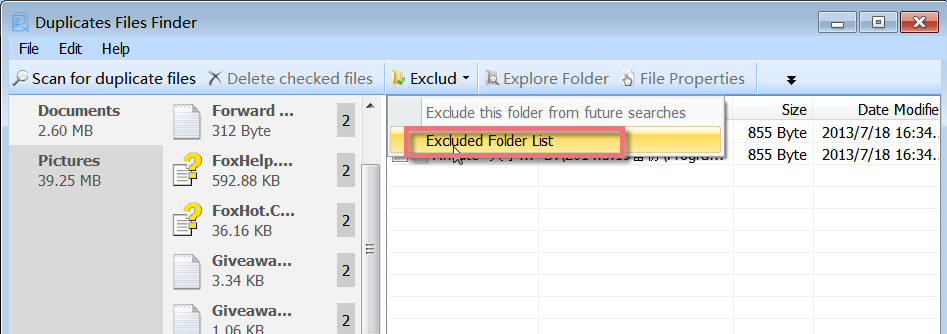
- If you would like to exclude a folder not currently displayed within the Excluded Folder list, you may do so in the following manner.
Click the ‘Add Folder’ button.
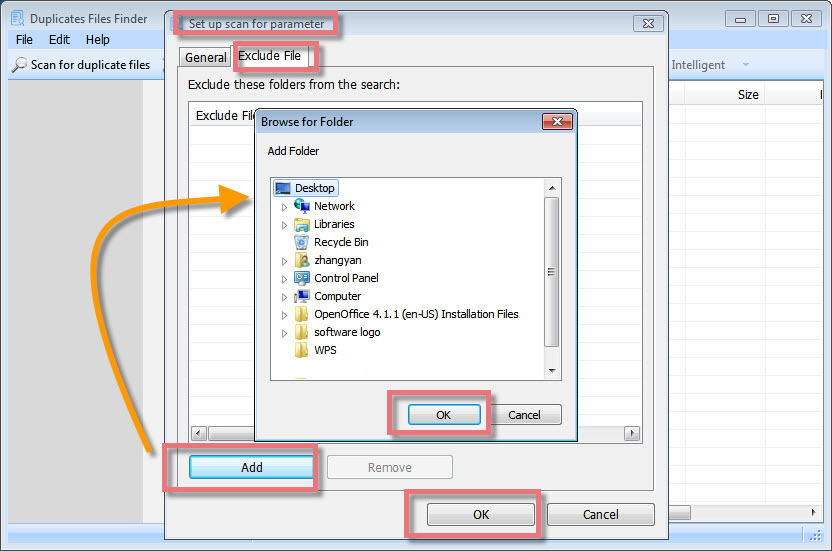
You’ll be presented with a box allowing you to browse your drives for the specific folder location you would like to add. Select this folder You can also use wildcards (* and ? ).
Click ‘Ok’
- Click the ‘Next’ button and wait for the process to complete. This might take some time.
- All the duplicate file groups will be listed. From each group, keep the original copy and checkmark the duplicate copy by viewing the properties/viewing the file by opening it with its associated program. Click ‘Delete checked files’ to remove all the check-marked files. By default, all deleted files are sent to the recycle bin.
Interface Overview
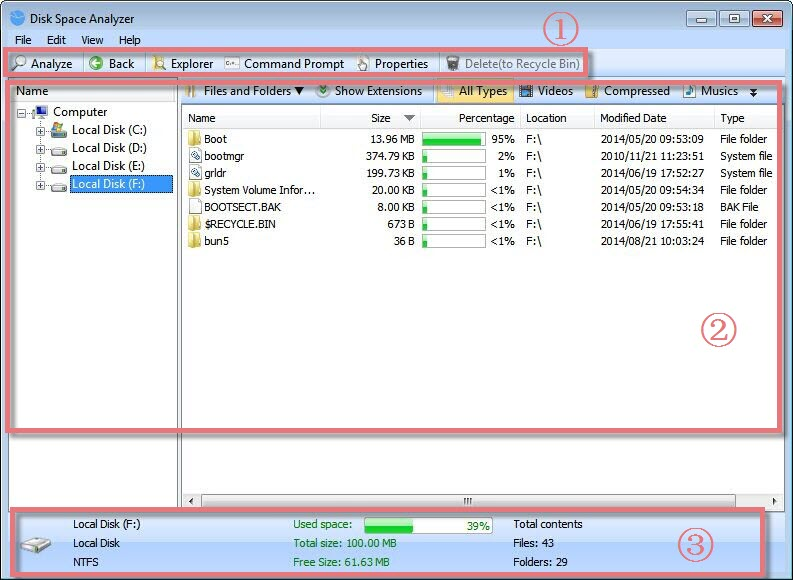
1.The Second Line Button: quick access button to Analyze, Back, Explorer, Command Prompt, Properties, and Delete the selected files.
2.The Upper Box: allows you to analyze the disk by Files and Folder, Extension, and other types, including Videos, Compressed, and Music, and shows File Name, File Size, Percentage, Location, and other information here.
3.The Lower Box: displays the analyzed disks with some information, such as disk capacity, free space size and used space percentage, analyzed file, and folder amounts.
Select all Drives or Single Drives or Folder to Analyze
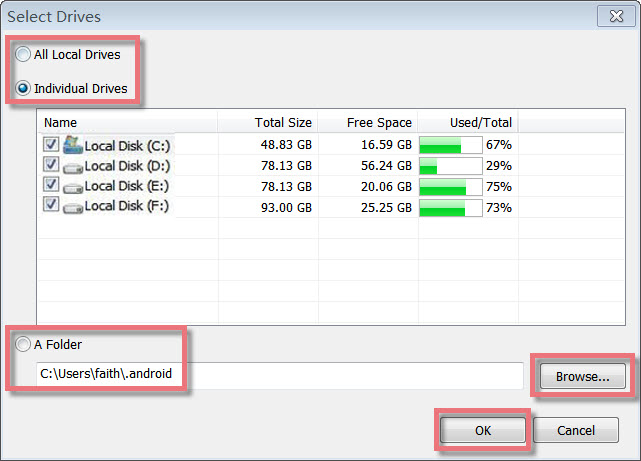
Disk Space Analyzer can scan all parts of a disk, analyzing many files. It offers a quick and effective way to analyze the files from local disks or folders and will show you a list of files on the drive. Just click “Analyze” and a box will pop up, which allows you to choose all drives or individual drives or a folder you want to analyze, and then click on the “OK” button, and all kinds of files will be shown at once.
Delete Useless files to Recycle Bin
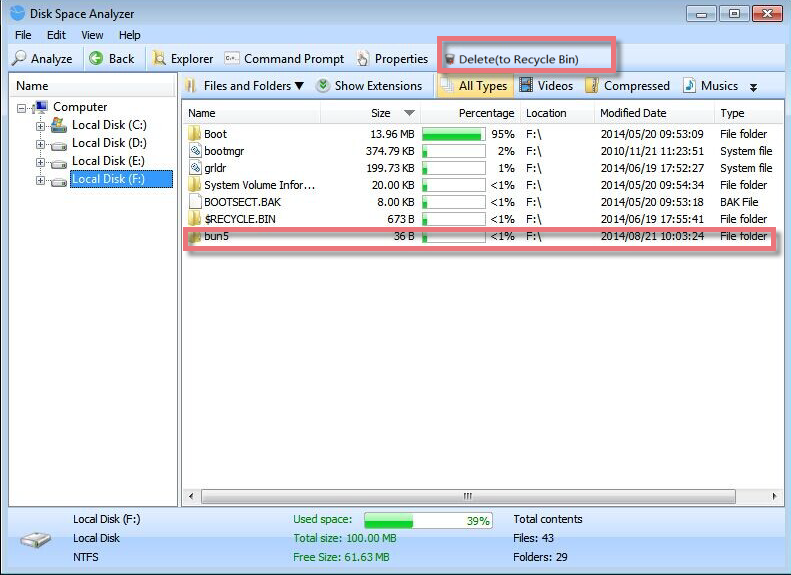
After analyzing the local drives, you can see how the data occupies your hard disk. By using Disk Space Analyzer, you can easily organize your data and quickly free up additional space on your disk when needed. Just select the Drive or folder to see which files are taking up most of your hard drive space. Then choose the useless files you want to delete, and click “Delete(to Recycle Bin)” to remove the unneeded files from your disk.
Integrate Disk Space Analyzer Into Windows Explorer Context Menu
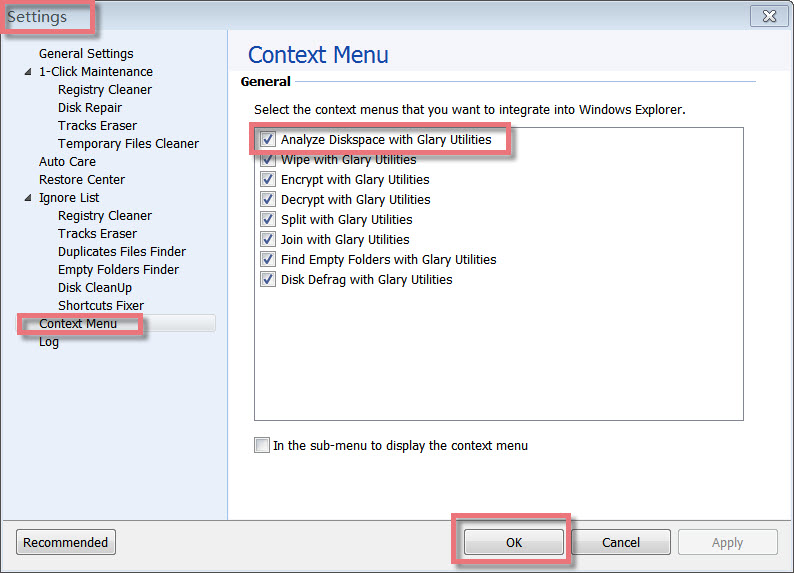
Disk Space Analyzer allows you to integrate itself into Windows Explorer Context Menu. You can open Glary Utilities, go to “Menu”, choose “Settings”, click on “Context Menu” and check the “Analyze Diskspace with Glary Utilities” option. Finally, click “OK” at the bottom of the page.
How to use Disk Space Analyzer
Start Disk Space Analyzer. Select the drive(s) or a folder you want ‘Analyze’ to analyze, then click ‘OK’.
Layout

There are three panes.
The left upper pane shows all disks on your PC. When you click it, all files will be shown in the right pane if you have analyzed the disk. You can view at a glance all the subfolders and files inside parent folders by clicking  icon.
icon.
The upper right pane shows the types of files, their size, percentage, and the total number of files of a particular extension in the analyzed drive/folder. You can quickly filter the specified file type in the current list, such as video, music, documents, image, and compressed files. When you click an extension, the bottom list will show all the files of this extension. You can also use the right-click popup menu to find more information.
The bottom pane shows you the number of all files and their attributes in the analyzed drive/folder.
]]>Interface Overview
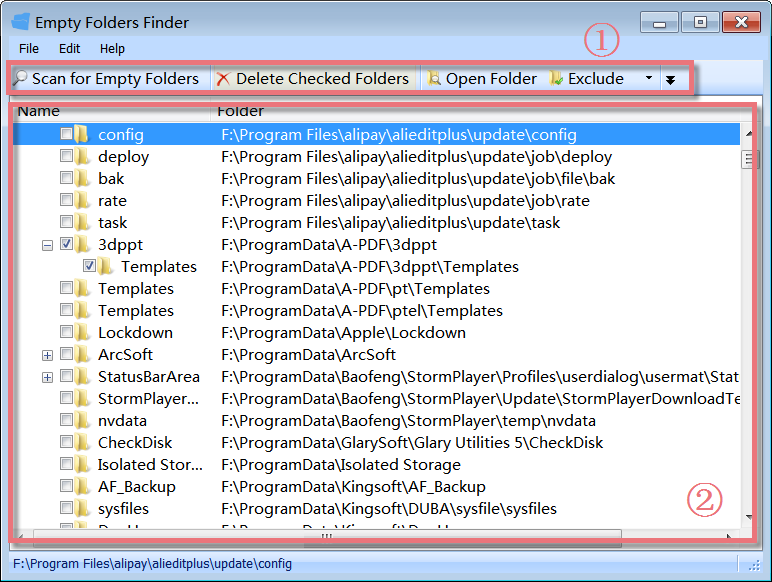
1.The Second Line Button: quick access button to Scan for Empty Folders, Delete Checked Folders, Open Folder,s and add the selected folders to Exclude folder list.
2.The Large Box: displays the empty folders with the name and full path of the folder.
Select all Drives or Folders to Scan
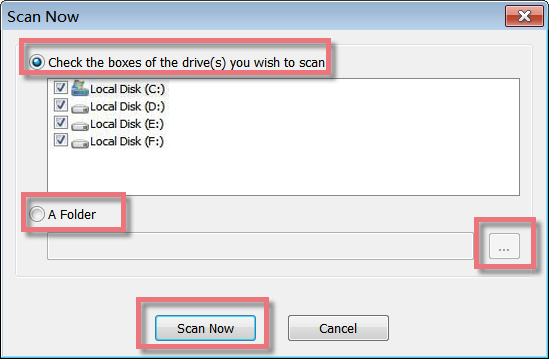
Empty Folders Finder can scan all parts of a disk for empty folders. It offers a quick and effective way to scan the files from local disks or folders and will show you a list of files on the drive. Just click “Scan for Empty Folders” and a box will pop up, which allows you to choose all drives or individual drives or a folder you want to scan, and then click on the “Scan Now” button and all empty folders will be shown at once.
Delete Checked Empty Folder to Recycle Bin
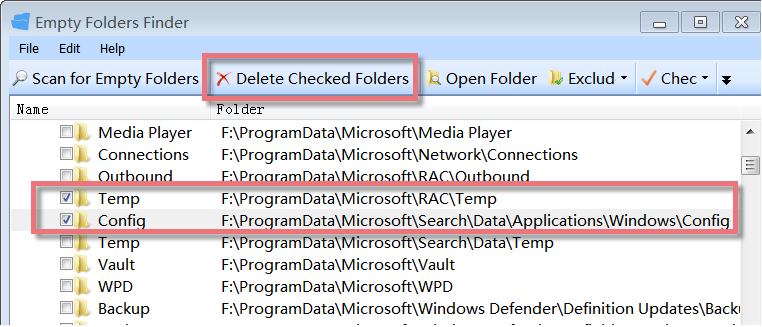
After scanning the local drives, you can see how many empty folders occupy your hard disk. If those empty folders are system folders, you needn’t remove them. Our recommendation is not to remove it. If the empty folders were created by yourself for storing files and then you haven’t put any files in them, then you’d better remove them. Just mark the box before the empty folders you want to delete, and click “Delete Checked Folders” to remove the empty folders from your disk.
Restore Deleted Empty Folders
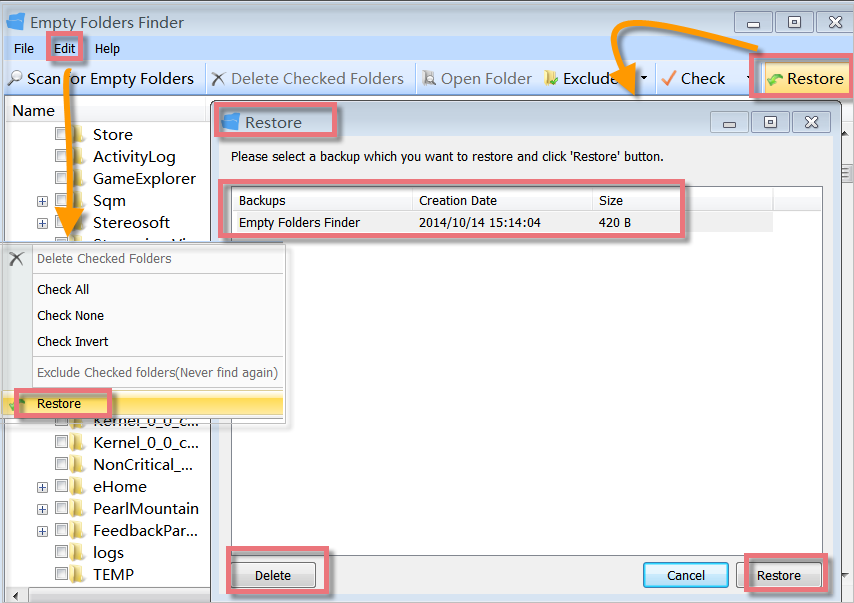
Empty Folders Finder can auto-backup the empty folders that you have deleted. If you have deleted some empty system folders, you can use the “Restore” feature to recover them. You can quickly restore deleted empty folders with Empty Folders Finder. First, find “Restore” from the “Edit” menu on the first line button or click the “Restore” button from the second line button, and then you need to choose the backups you want to restore, finally, click “Restore” in the lower right corner.
Menu Check more than one Empty Folders Group
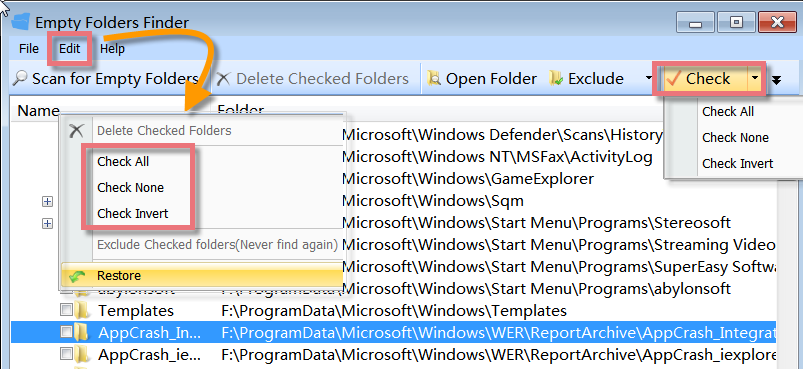
Empty Folders Finder offers a great feature that can check more than one empty folder group at a time to save you much time on checking empty folders. Just click “Check”. It can help to check all the empty folders at once. If you want to check all folders, check none, or invert, click an inverted black triangle symbol beside “Check” or click the “Edit” menu on the first line button.
How to use Empty Folders Finder
1. Click ‘Scan for empty folders’. Select the drives you want to scan by checking the appropriate drives.
2. Click the ‘Scan Now’ button and wait for the process to complete. You can cancel the scanning process by pressing the Cancel Button.
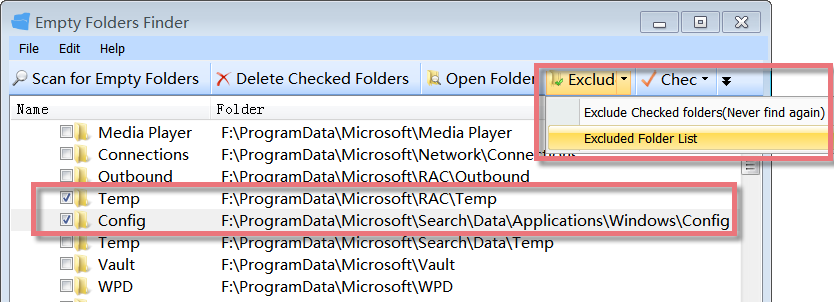
3. From the list of empty folders, you can select those you want to delete by checking them. You can also ignore the folder while scanning by clicking ‘Exclude this folder(Never find again)’ from the Edit menu or on the Second Line Button. Select the folders and right-click on them to see a context menu. The various options given are self-explanatory.
4. Click ‘Delete checked folders’ to send all selected empty folders to the Recycle Bin.
]]>